Ornithine Charge and FF Params within ANTECHAMBER
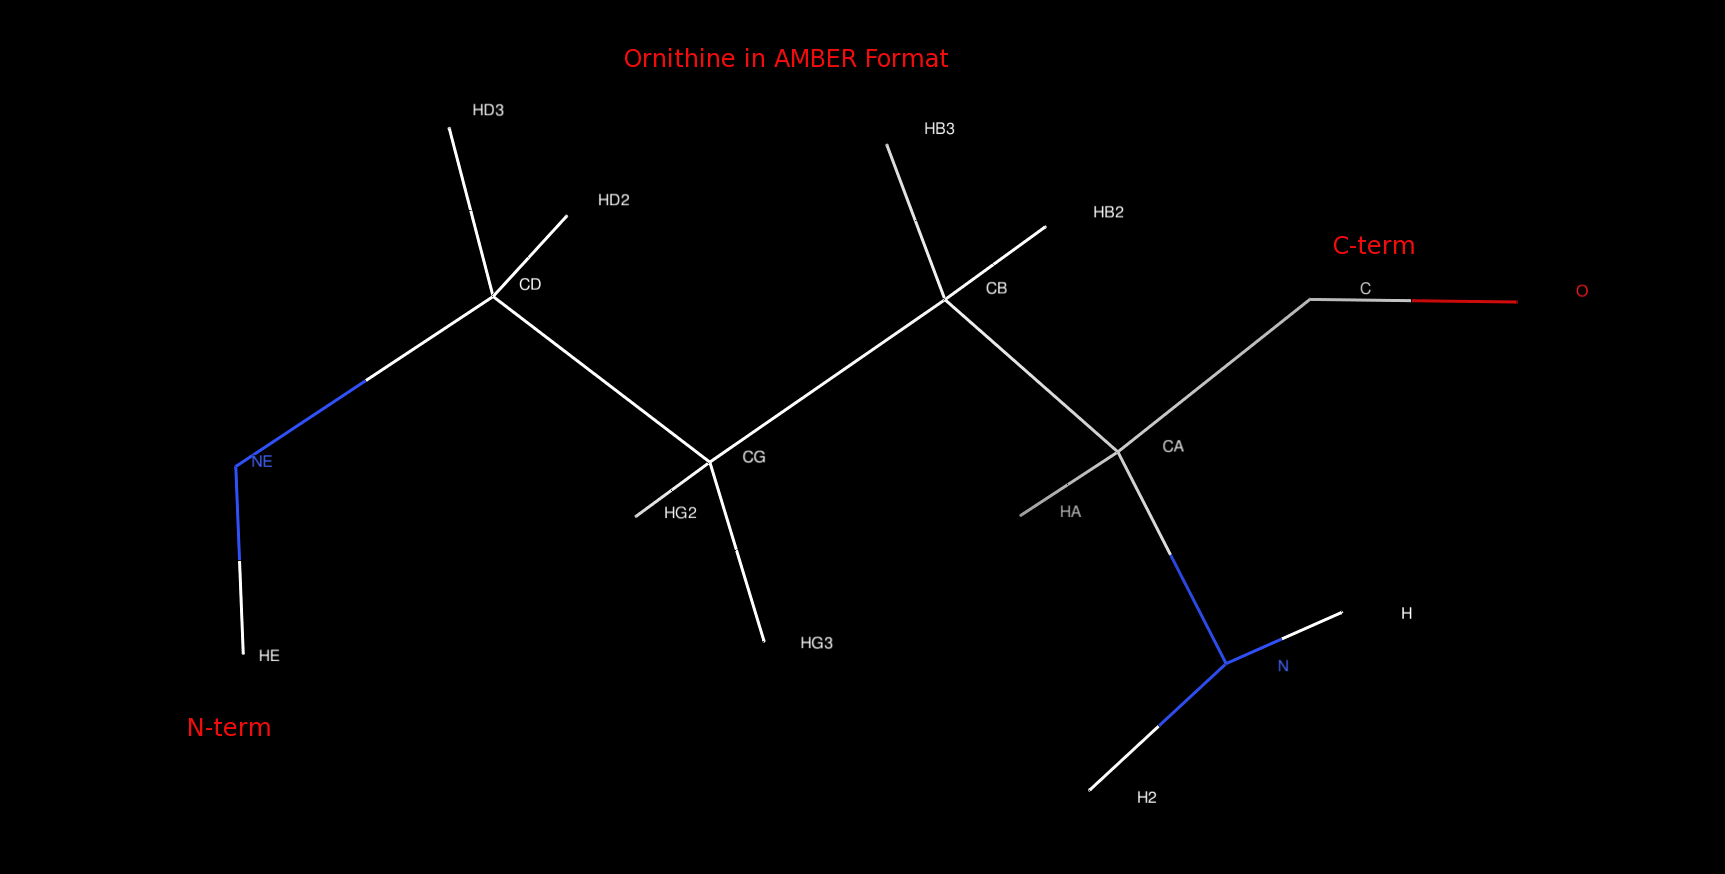
TABLE OF CONTENTS
IntroductionBuild the Initial structure within MolView
Convert to MOL2 using BABEL
Calculate Charges in ANTECHAMBER
PARMCHK2 - Generate modified force-field
Remove NME/ACE with PrepGen
LEAP - Test files in AMBER
Appendix
Introduction
This tutorial aims to build an Ornithine residue to use in AMBER MD for NMR refinement. We first calculated a structure within CYANA and now would like to refine further within AMBER taking full advantage of the force field and implicit solvation. ORN will have its atom charges calculated within AMBERs ANTECHAMBER module at the AM1-BCC level of theory. The additional force field modifications are built from AMBERs parmchk2 functionality.This tutorial here is built from another where people actually know what they are doing:
- Tutorial5 - AMBER Tutorial 5 of GFP
Software used:
- CentOS 7 - The Linux OS which is free
- Amber 14 - Our Amber version
- BABEL - Conversion software that is downloaded within Avogadro2 actually.
- MolView - Web interface for drawing molecules.
- Chimera - PDB etc viewer.
The first part of our tutorial is directed towards people with access to our PC at UIC. Outside users can find the files at the bottom of this page however Appendix
Login
ssh (secure shell)
1. Use the ssh command to remote login to our workstation. -Y means portforward -l means usernameNote that the "$" is the command line prompt in the terminal.
$ ssh -Y -l username 131.193.196.29Login in as if you are sitting at the computer. You might need to run VPN client to access UIC as well before using ssh. Most of the work for this tutorial will be done mainly through the terminal.
$ cd /home/andyn/people/tutorials/amber_build
$ ls
ante_template  ante_template.tar  chignolin  old  ornithine  sarcosine
$ cp -r ante_template test
$cd test
$ ls
cyana_build  final_forcefield  go_ante  go_babel  go_parm2  go_prep  leap_test  orn_full.mol
Here you can see we have several "go" scripts and a few directories. There is also an orn_full.mol file which is drawn below.
Build the initial structure within MolView
Build the Ornithine in MolView and be sure to add in the NME and ACE caps as shown below. The drawing interface is fairly intuitive. Save the structure as orn_full.mol and export in MOL format the viewer provides.
- MolView - MolView web page
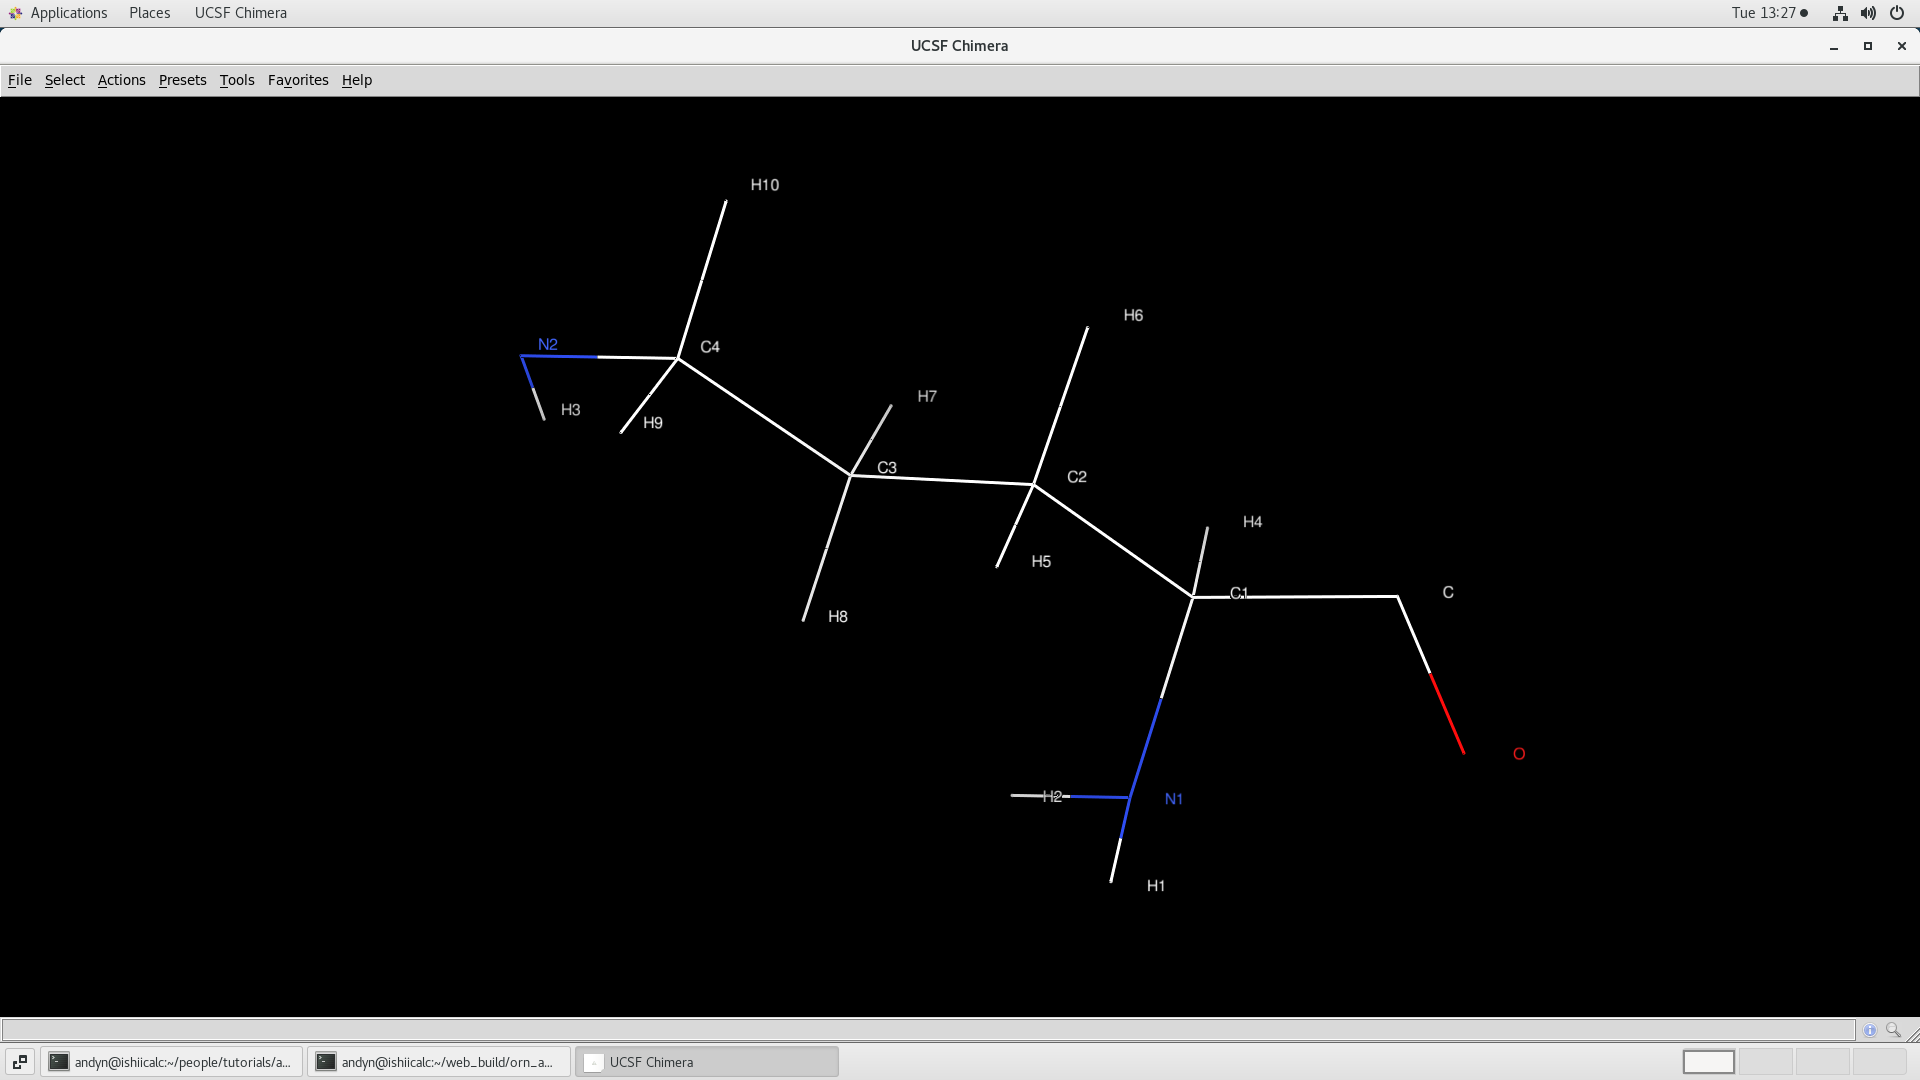
Here is the final structure as observed in chimera:
$ chimera orn_full.mol
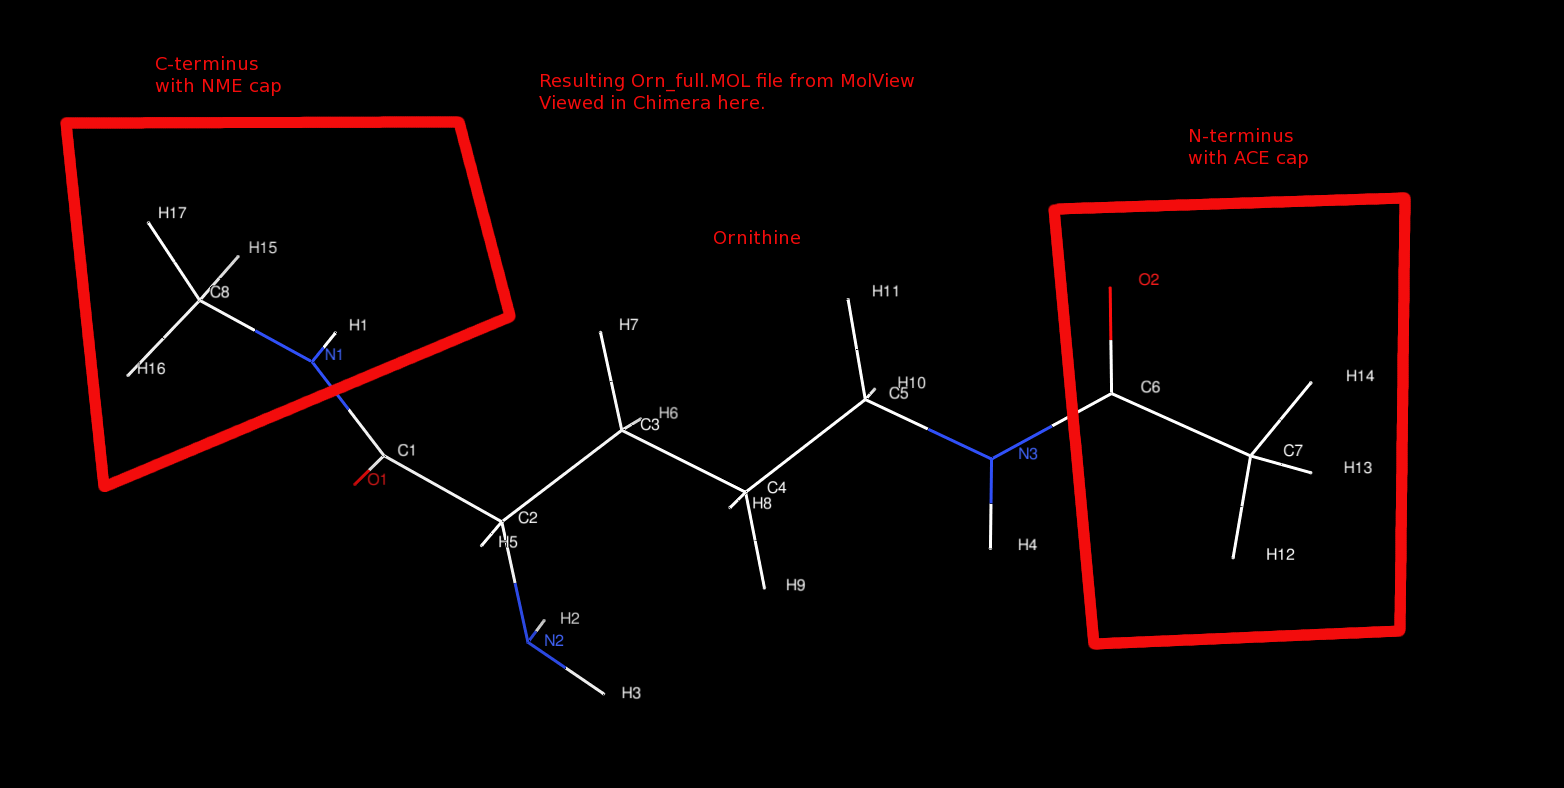
The resulting orn_full.mol file looks like:
- orn_full.mol - MOL file
We now need to convert from MOL to MOL2/SYBYL format.
Convert to MOL2 using BABEL
The conversion is simple using the line command below.
$ ./go_babel
1 molecule converted
21 audit log messages
And having a look inside the go_babel script
$ more ./go_babel
babel -imol orn_full.mol -omol2 start.mol2
The resulting start.mol2 file looks like:
- start.mol2 - MOL2 file to start
Calculate Charges in ANTECHAMBER
Launch AnteChamber:
$ ./go_ante
Total number of electrons: 102; net charge: 0
Running: /opt/amber14/bin/sqm -O -i sqm.in -o sqm.out
And having a look inside the go_ante script
$ more ./go_ante
antechamber -fi mol2 -fo ac -i start.mol2 -o demo.ac -c bcc -j 4 -at amber
The breakdown goes
- -fi - file input is MOL2 format
- -i - file input name is start.mol2
- -fo - file output is antechamber format
- -o - file output name is demo.ac
- -c - charge type is AM1-BCC
- -at - atom type is "AMBER" format
- -j - atom type and bond type prediction index (full at 4)
- demo.ac - AnteChamber result. Note it looks like a PDB and can be read as such.
$ chimera demo.ac
PARMCHK2 - Generate modified force-field parameter file
Now the modified force-field file is generated with the module parmchk2. I believe it reads in AMBER GAFF by default in the attempt to build in everything. GAFF is usually written in lower case but since our system is much like the a standard amino acid I'll keep it in capital letters. This function saves an incredible amount of time for the user. Note we generate the the modified FF params before removing the caps. This way we don't get errrors regarding missing params for neighboring residues.
$ ./go_parm2
And having a look inside the go_parm2 script
$ more ./go_parm2
  parmchk2 -i demo.ac -f ac -o frcmod.orn -a Y
The resulting frcmod.orn file looks like:
- frcmod.orn - Modified FF parameter file
In the above watch for Needs Attention flags as the FF wouldn't be ready for use if seen. We were lucky and all additional parameters were found in GAFF. Also note we could have run this script before editing the prepin.orn file as it just uses atom types and not the atom names.
Remove NME and ACE using PrepGen module
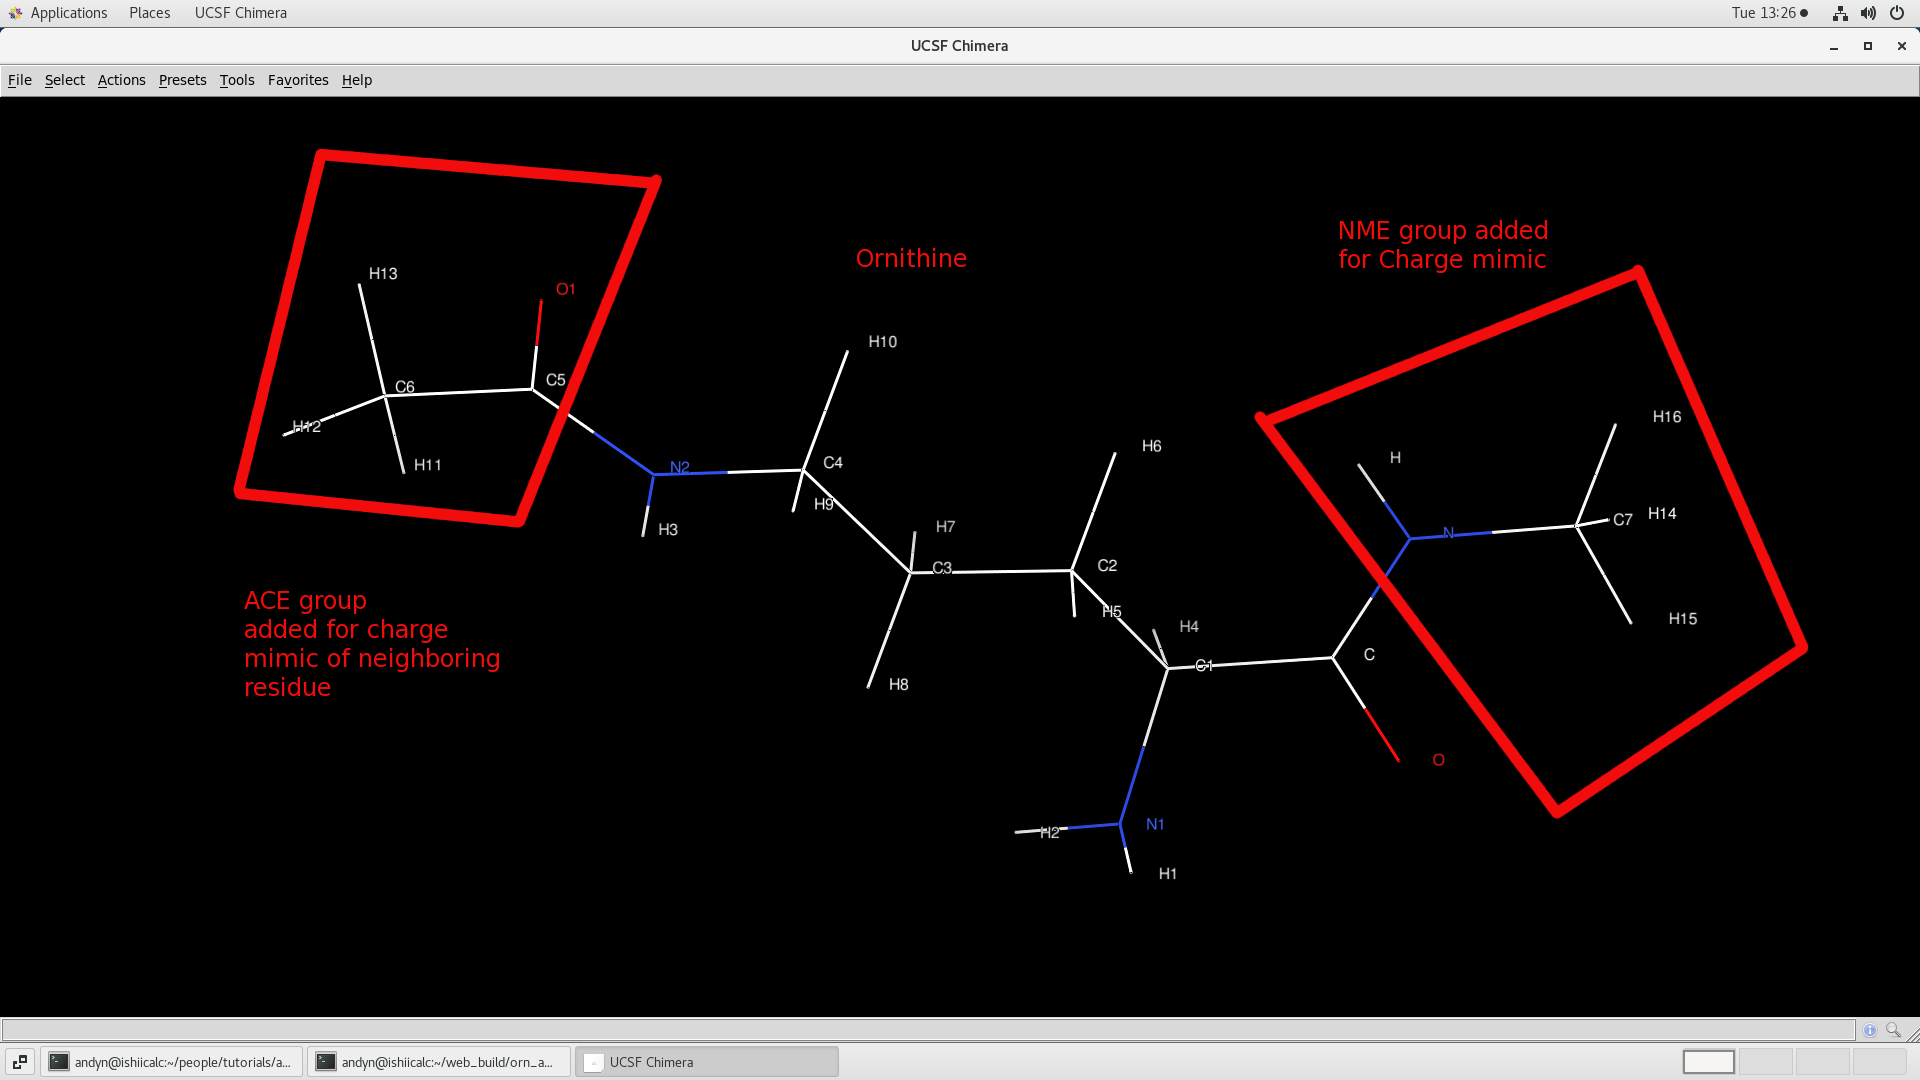
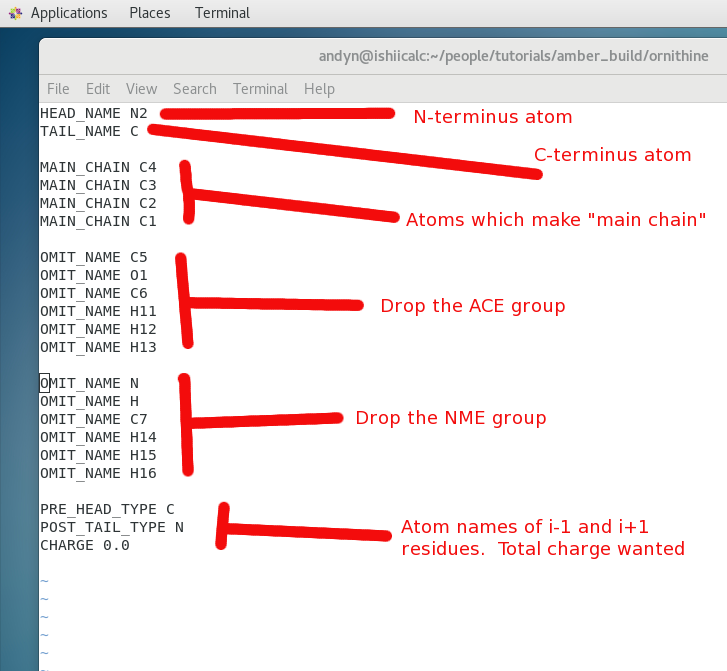
We now would like to remove the NME/ACE caps from our residue and generate a file AMBER could use in preparing the custom residue with its unique charges etc. The file we will edit is the demo.ac which remember looks a bit like a PDB file. The prepgen module allows us to read in an editing file with the atoms we want to keep, the ones to omit and so on. Using the chimera viewer of the demo.ac file above we begin to generate a file called demo.mc:
look inside go_prep script
$ more ./go_prep
prepgen -i demo.ac -o prepin.orn -m demo.mc -rn ORN
The breakdown goes
- -i - antechamber input file created above
- -o - output file of edited prep file
- -m - input of modifying we created
- -rn - name the residue ORN
- demo.mc - The prepgen editing file.
Now run the go_prep script
$ ./go_prep
PRE_HEAD_TYPE is     C
POST_TAIL_TYPE is     N
Net charge of truncated molecule is     0.00
TAIL_ATOM      3    C
HEAD_ATOM     12   N2
MAIN_CHAIN     1   12   N2
MAIN_CHAIN     2   11   C4
MAIN_CHAIN     3   10   C3
MAIN_CHAIN     4    9   C2
MAIN_CHAIN     5    5   C1
MAIN_CHAIN     6    3    C
OMIT_ATOM      1   13   C5
OMIT_ATOM      2   14   O1
OMIT_ATOM      3   15   C6
OMIT_ATOM      4   25  H11
OMIT_ATOM      5   26  H12
OMIT_ATOM      6   27  H13
OMIT_ATOM      7    1    N
OMIT_ATOM      8    2    H
OMIT_ATOM      9   17   C7
OMIT_ATOM     10   28  H14
OMIT_ATOM     11   29  H15
OMIT_ATOM     12   30  H16
Number of mainchain atoms (including head and tail atom):     6
Number of omited atoms:    12[andyn@ishiicalc test]$
If we get messages about connectivity definitions etc in the above output then check evertyhing again as something isn't right. Everything looks good above so far however. Looking in the directory a file called NEWPDB.pdb which represents the new structure without NME/ACE was generated.
$ chimera NEWPDB.pdb
The termini look better and there aren't any obvious issues with the structure. Now we would like to edit the prepin.orn to correct the atom names so they match CYANAs naming convention. I do this so the NOEs transfer over to AMBER properly.
$ gedit prepin.orn
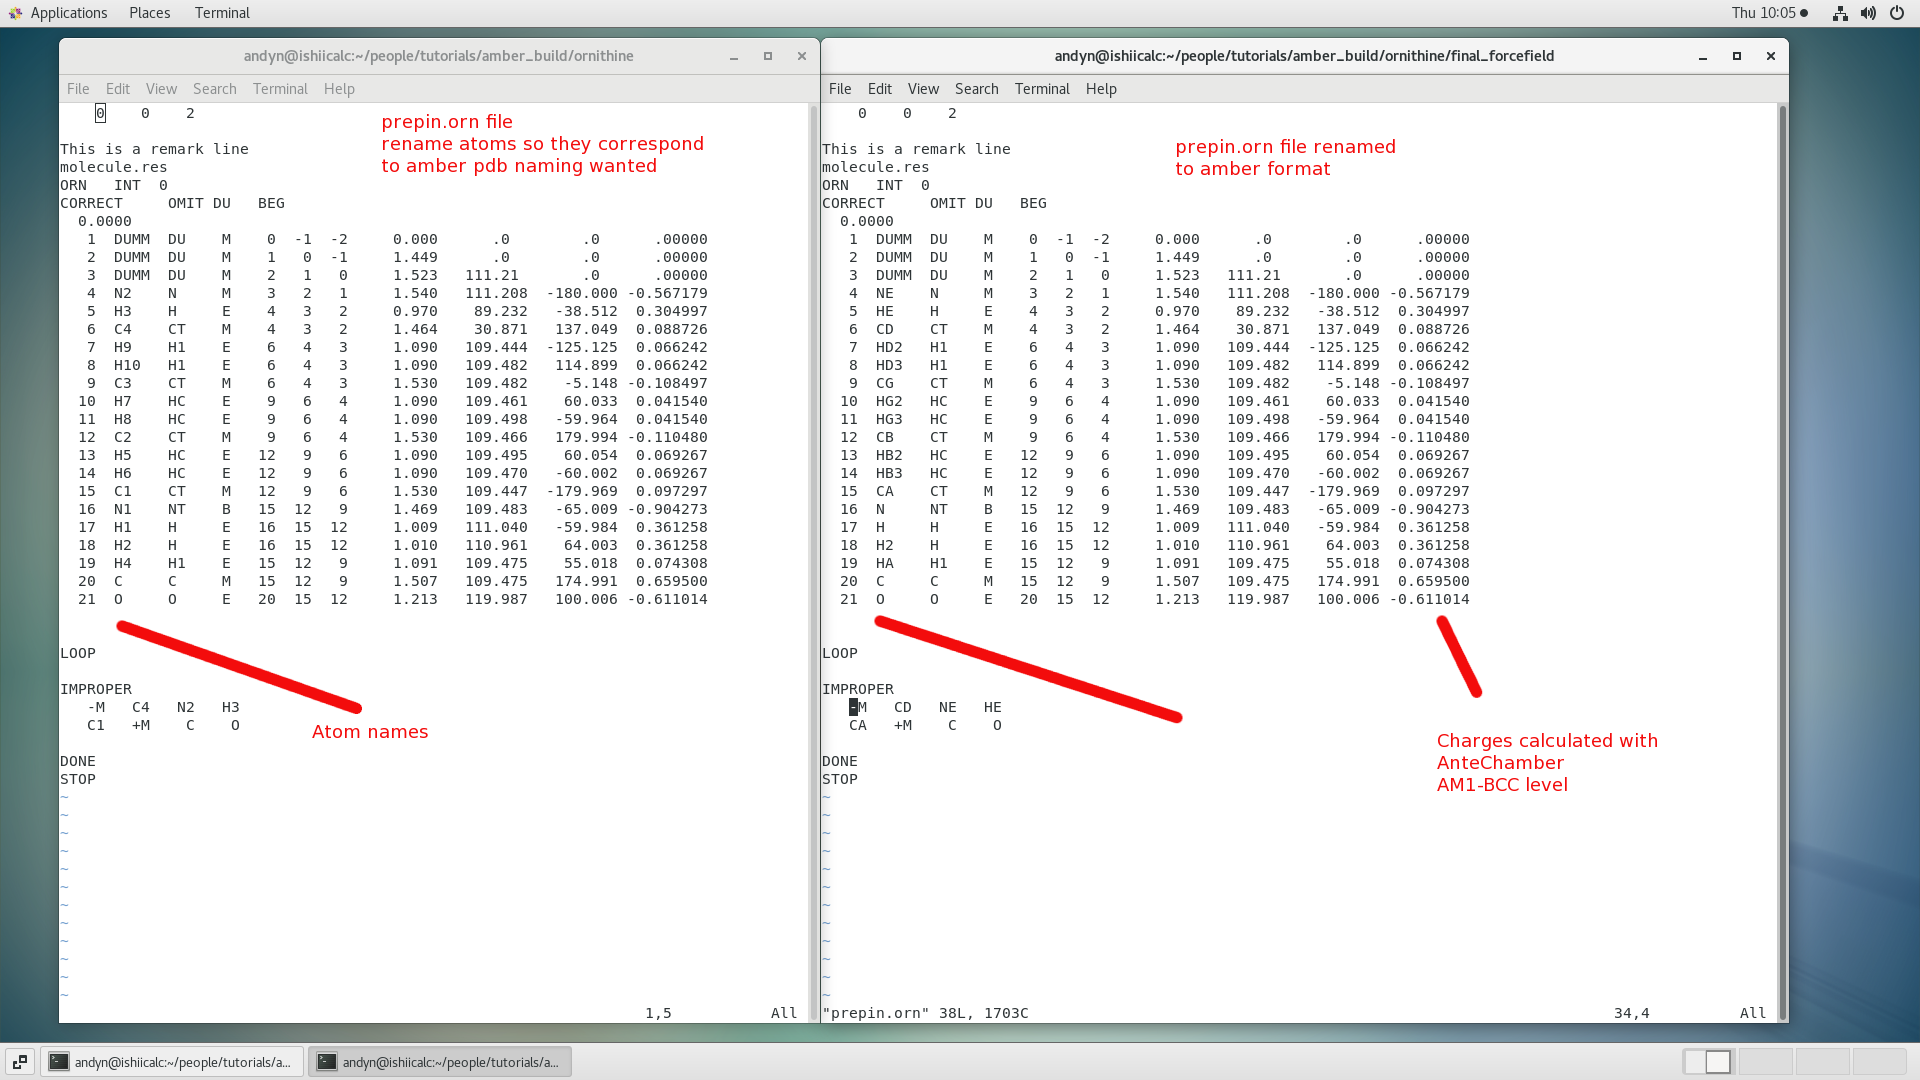
Don't forget to rename the impropers above too!
We have the 2 important files now: frcmod.orn and prepin.orn. Lets back them up for safe keeping.
$ cp prepin.orn ./final_forcefield/
$ cp frcmod.orn ./final_forcefield/
$ ls ./final_forcefield/
frcmod.orn  prepin.orn
LEAP - Generate simple structure for testing
Lets run a quick test of the new parameter files in LEAP to see if the structure builds OK.
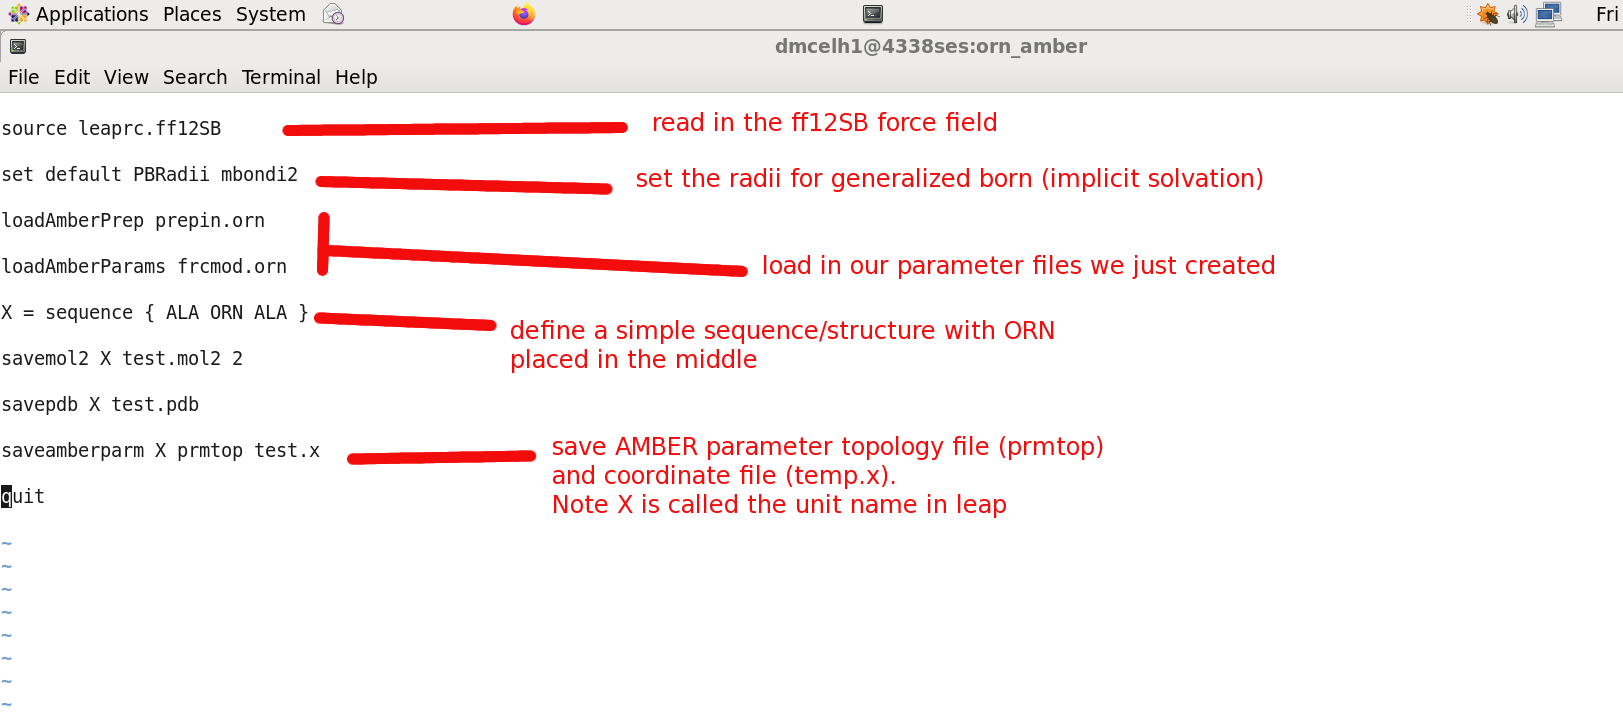
$ cd ./leap_test
$ ls
go_tleap  leap.in  orig
$ gedit leap.in
$ cp ../final_forcefield/* .
$ ls
frcmod.orn  go_tleap  leap.in  orig  prepin.orn
- leap.in - leap.in file to read
Now run LEAP
$ tleap -s -f ./leap.in
Welcome to LEaP!
Sourcing: ./leap.in
----- Source: /opt/amber14/dat/leap/cmd/leaprc.ff12SB
----- Source of /opt/amber14/dat/leap/cmd/leaprc.ff12SB done
Log file: ./leap.log
etc...
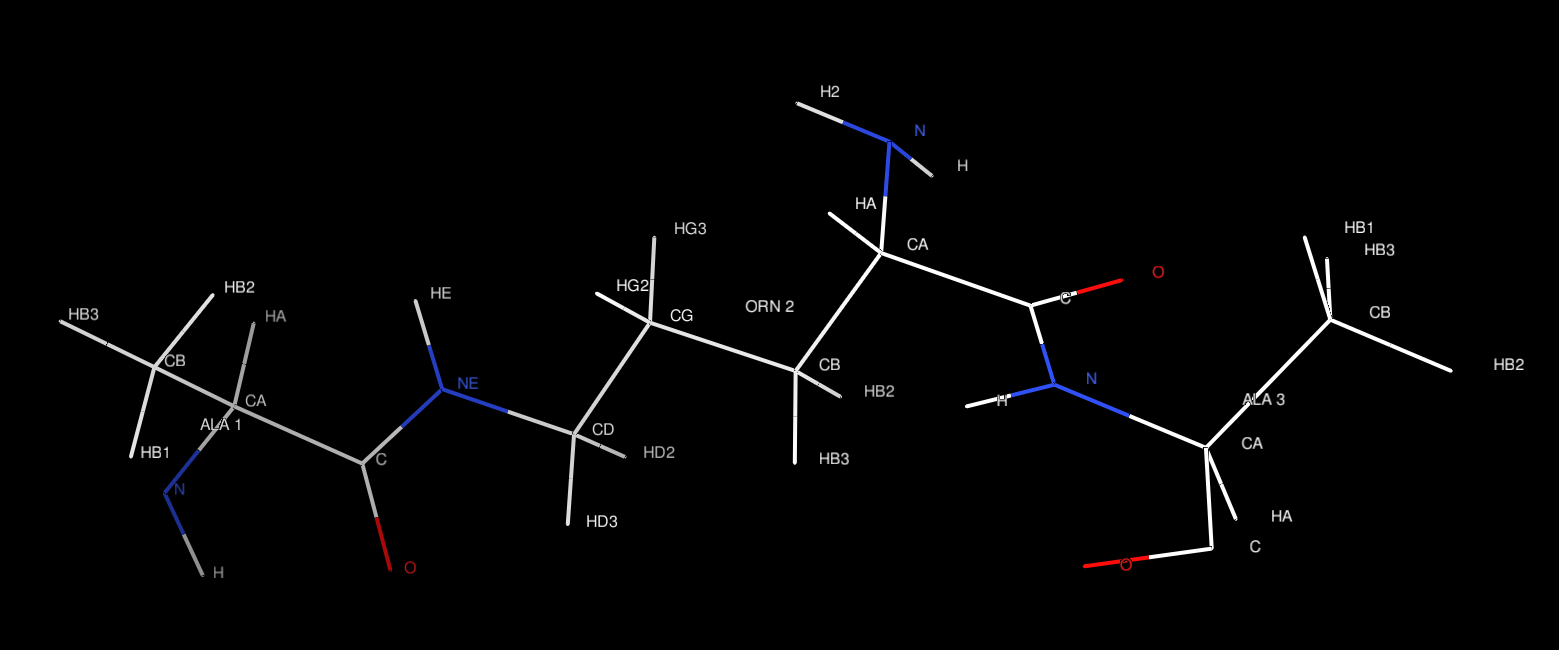
look in the leap.log perhaps for errors while loading. also be sure prmtop and temp.x files were created. lastly:
$ chimera test.pdb
Appendix Files:
All of the files for the tutorial are available here:tut.zip