Creating cyclic peptides with Ornithine in CYANA
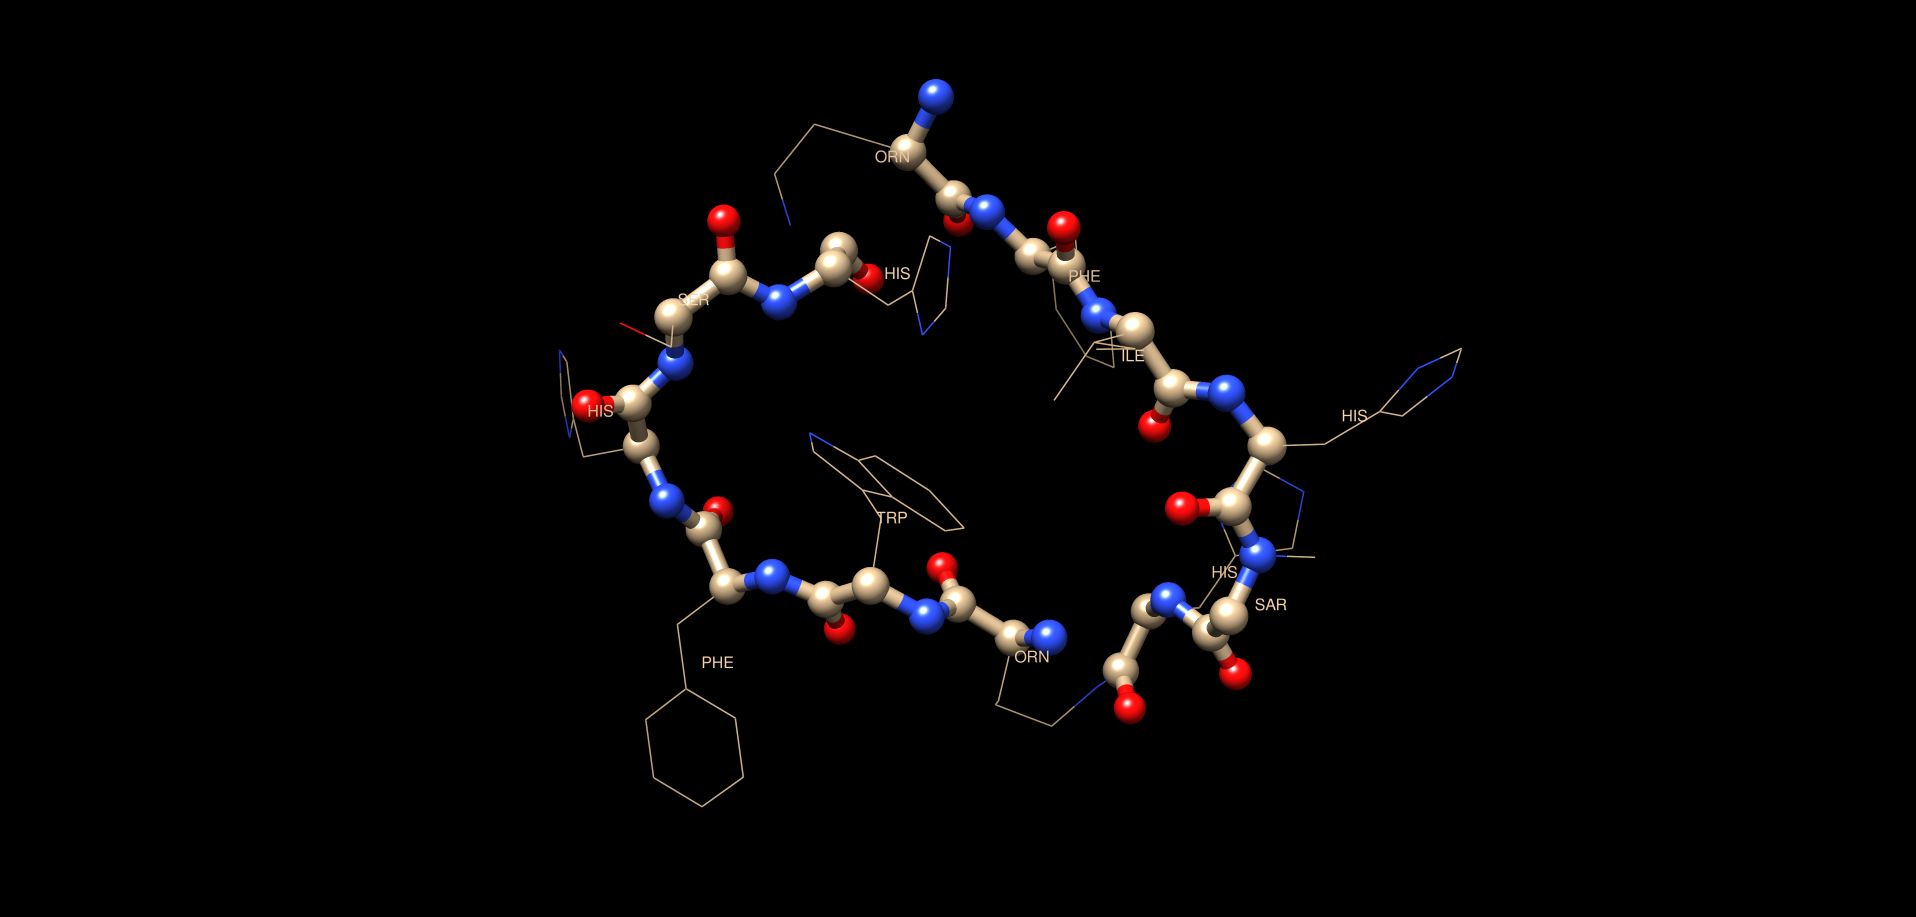
TABLE OF CONTENTS
IntroductionBuild the Initial structure
Starting sequence file
NOE tables/formats
Appendix
Introduction
This tutorial aims to build a cyclic peptide having Ornithine connections thru the NE of its chain. The cyclic geometry is driven by synthetic NOE restraints as discrete bonds are unfortunately difficult with torsional angle dynamics TAD (CYANA). Using NOEs we are able to get a very close structure regardless and take advantage of CYANAs rapid folding and NOE assignment algorithm. We will take the ensemble of structures solved here with their derived NOE/ACO restraints and refine them further in AMBER MD in a later tutorial. Some may choose to stop at the CYANA structure however which is fine as well.Reference pages:
The CYANA/CYLIB general links are available here:CYANA_wiki - Wiki site with many links, tutorials, formats etc
CYLIB_manuscript - The manuscript to read
CYLIB_tut - Build custom residue amino acid for CYANA
On our 8 CPU workstation we have the following settings:
- CentOS 7 - The Linux OS which is free
- Cyana3.98 - The latest version of CYANA as of 9/2020.
- Avogadro2 - Molecular viewing software. Avogadro2 installs OpenBabel as well for data format conversion.
- Molmol - Molecular viewing software which is a bit older but very useful. Molmol is another program from the Wuthrich as is DYANA/CYANA. consequently the 2 programs work well together and even use the same library files for defining the residue types and ligands. Molmol also has a number of functions which are friendly to NMR users (NOE viewing etc)
Code_academy - Learn line commands and BASH scripting.
The first part of this tutorial is directed towards people with access to our PC at UIC. Outside users can find the files at the bottom of this page however Appendix
Login
ssh (secure shell)
1. Use the ssh command to remote login to our workstation. -Y means portforward -l means usernameNote that the "$" is the command line prompt in the terminal.
$ ssh -Y -l username 131.193.196.29Login in as if you are sitting at the computer. You might need to run VPN client to access UIC as well before using ssh. Most of the work for this tutorial will be done mainly through the terminal.
List files and make a directory (folder) to store your files in
When you first log in and start a terminal, your current working directory (or folder) is your home directory. It has the same name as your username, and it is where your files and directories are stored. In most cases, this is /home/usernamels (list)
2. Use the ls command to list what is in your current directory.Note that the "$" is the command line prompt in the terminal.
$ ls
Desktop  Documents  Downloads  Music  Pictures  Public  Templates  Videos  articles  bin
molmol  orig  people
At this point there will probably be some files and directories in your
home directory that are created automatically with your account. Above is for
our system.
As a quick sidenote I store all the software for users in the /opt/ directory as seen here:
$ ls /opt/
amber14  bin  cyana-3.98.13 molmol pdbstat
cd (change directory)
At this point, you'll want to move into your Tutorial directory so that you can save all of your working files there.3. Use the cd command to change to different directory.
$ cd people $ ls
andy_cyclic  francis  molmol_library  peptide_bond  sabari  sherrie  thuc  tutorials
$ cd thuc $ ls
sample1 test
$ rm -rf test $ ls
sample1
$ cp -r sample1 test $ ls
sample1 test
$ cd test $ ls
pdb_build  refine
OK where are we now? Use:
pwd (print working directory)
Pathnames describe what directory you are relative to the entire computer's filesystem. We started from /home/username/4. Print the working directory pathname of your current directory with pwd
$ pwdAnd the directories and files located here are:
/home/andyn/people/thuc/test
$ ls pdb_build refine
There are 2 directories pdb_build and refine. In pdb_build we generate:
- Sequence/structure pdb demo.pdb
- start.prot file/table to fill in with chemical shift assignments
Build the initial structure and assignment table file
$ cd pdb_build $ ls CALC.cya clean clean_1.pdb demo.ovw demo.pdb demo.seq go_cyana go_pdbclean link.lol link.upl orig start.prot start.seq
lets clean the directory using the clean script.
$ ./clean $ ls clean go_cyana go_pdbclean orig start.seq
The important files left behind:
- start.seq - Sequence file to begin
- go_cyana - The go_cyana BASH script
- go_pdbclean - Remove the linker atoms etc in pdb
- clean - The clean script
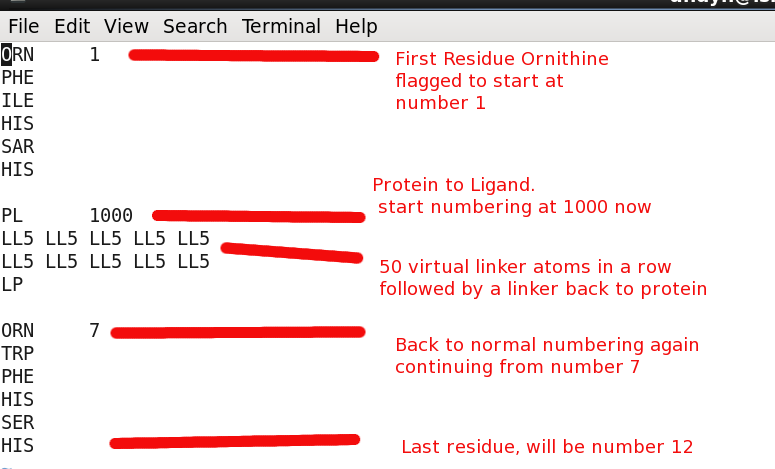
The clean script is trivial and just removes everything we will regenerate anyway. Lets have a closer look at the start.seq. I call it start.seq as it will end up named demo.seq after it is modified somewhat with the NOE links. See below:
Sequence file "start.seq"
Peptide Sequence including linker atoms
The peptide sequence requires "linker" atoms between broken parts of the chain. This essentially keeps the entire sequence in a continuous fashion which is required by the CYANA program. The special linker atoms do not have charge or vdW values and move right thru other atoms. They only serve for book keeping purposes basically.
The linker atoms have type:
- PL - Protein to linker connection (protein is standard amino acid)
- LP - Linker to protein connection
- LL2 - 2 linker atoms in a row
- LL5 - 5 linker atoms in a row
Another important aspect of the linker atoms is you need enough of them included in a run so the attached ligand/residue has enough freedom to move in space and bond/coordinate as needed. Such as having a long enough leash...
Here is the starting file start.seq with annotations:
Build initial structure and generate "start.prot" file
The many files used and created in this script are here:
- go_cyana - the go_cyana used below
- demo.seq - the resulting demo.seq file created. Note at the bottom of file the "link" statements which were created thru the ornbond_dm macro. This removes steric clash energies temporarily since we are using synthetic NOEs to create bonds.
- link.upl - the resulting link.upl file created
- demo.pdb - the resulting demo.pdb file created
- start.prot - the resulting start.prot file created. This is the NMR assignment table needed to be filled in. Note 999.00 is unassigned Once filled in save as demo.prot perhaps.
- ornbond_dm.cya - the ornbond_dm.cya file used to create linking NOEs between ORNITHINE and its neigboring residues. Located in /opt/cyana/macro/
- pdb2prot.pl - the pdb2prot.pl perl script to create start.prot from demo.pdb file.
Here is the go_cyana with annotations:
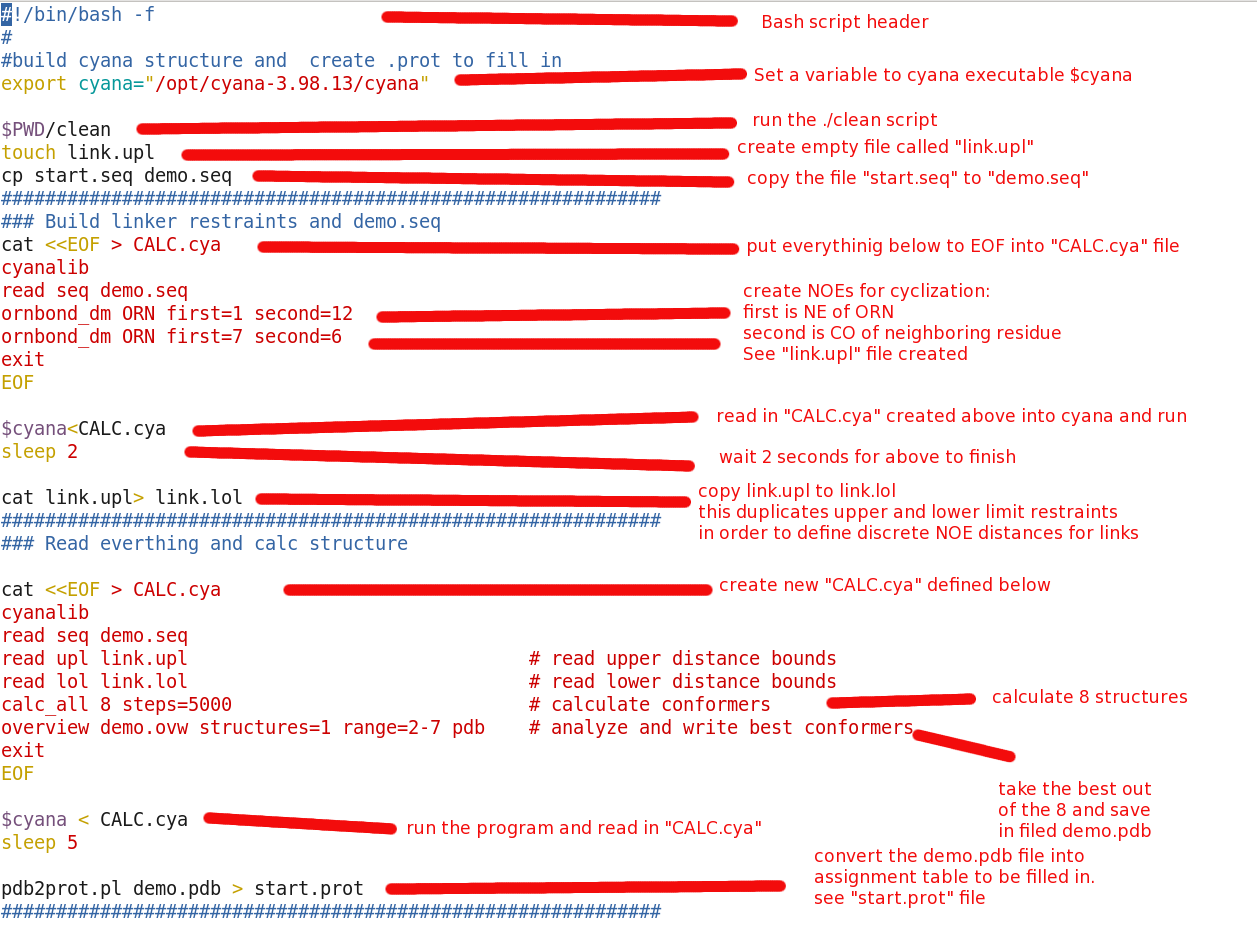
Although above looks complicated it is useful to have all commands located in one BASH script. Now we can make minor alterations for which ever system we would like to create the next time. Lets run the go_cyana script and see how things look:
$ pwd
/home/andyn/people/thuc/test/pdb_build
$ ./go_cyana
CYANA 3.98.13 (linux64-intel)
Copyright (c) 2002-20 Peter Guentert. All rights reserved.
___________________________________________________________________
Academic license for Dr. Daniel McElheny, University of Illinois Chicago, USA.
Library file "/opt/cyana-3.98.13/lib/cyana.lib" read, 47 residue types.
Sequence file "demo.seq" read, 24 residues.
cyana> Library file "/opt/cyana-3.98.13/lib/cyana.lib" read, 47 residue types.
cyana> Sequence file "demo.seq" read, 24 residues.
cyana> Restraints for cyclic peptide bond between residues 1 and 12 added.
cyana> Restraints for cyclic peptide bond between residues 7 and 6 added.
cyana> ___________________________________________________________________
CYANA 3.98.13 (linux64-intel)
Copyright (c) 2002-20 Peter Guentert. All rights reserved.
___________________________________________________________________
Academic license for Dr. Daniel McElheny, University of Illinois Chicago, USA.
Library file "/opt/cyana-3.98.13/lib/cyana.lib" read, 47 residue types.
Sequence file "demo.seq" read, 24 residues.
cyana> Library file "/opt/cyana-3.98.13/lib/cyana.lib" read, 47 residue types.
cyana> Sequence file "demo.seq" read, 24 residues.
cyana> Distance restraint file "link.upl" read, 10 upper limits, 10 assignments.
cyana> Distance restraint file "link.lol" read, 10 lower limits, 10 assignments.
cyana> 8 structures selected.
8 random structures created (seed 3771).
Structure annealed in 0 s, f = 2.89651.
Structure annealed in 0 s, f = 2.06913.
Structure annealed in 0 s, f = 2.97279.
Structure annealed in 0 s, f = 1.97469.
Structure annealed in 0 s, f = 2.27428.
Structure annealed in 0 s, f = 2.15249.
Structure annealed in 0 s, f = 2.74205.
Structure annealed in 0 s, f = 2.07328.
8 structures finished in 2 s (0 s/structure).
cyana>
Structural statistics:
str target upper limits lower limits van der Waals
function # rms max # rms max # sum max
1 1.97 2 0.1507 0.34 0 0.0154 0.03 4 2.0 0.34
Cut 0.20 0.20 0.20
Overview file "demo.ovw" written.
PDB coordinate file "demo.pdb" written, 1 conformer.
cyana> [andyn@ishiicalc pdb_build]$
The program read in the libraries, NMR restraints (.upl/.lol), sequence file etc fine it seems. Then 8 structures were calculated having their "target function potential" reported with values of ~2 (ok not great). Lastly, a single demo.pdb file is generated.
molmol demo.pdb
Some comments regarding "start.prot" and next steps
So far the goal has been to see if we could create a CYANA structure from our sequence and if so to create a chemical shift assignment table to fill in start.prot. In the case of our peptide we are only using 1H chemical shifts. The expts utilized for assignment are:
- 2D NOESY (250ms mix)
- 2D COSY
- 2D IN-PHASE COSY (used to get 3J/PHI restraint)
- 2D TOCSY (80ms mix)
- peptide_assign.pdf - An assignment strategy for unlabelled peptides.
When filling in the demo.prot table:
- try to use the NOE spectrum peak positions for the assignments
- we do this because the NOE is most important and contains the structure
- degenerate diasterotopic atoms (HB2/HB3 etc) can be given the same assignment value. CYANA will correct this later by designating a pseudo/ambiguous atom QB.
- unique diasterotopic atom assignments (HB2/HB3 etc) do not have to be known. Fill them in however and CYANA will assign them correctly later
- use ppm values to only 3 decimal places (119.243) ppm etc
- unassigned is 999.00
- error of 0.01 is ok for now
- again back your table up and save as demo.prot. it is very easy to get overwritten as start.prot
NOE tables/formats
Now that we have the assignment tables we are ready to have the NOEs in the 2D NOESY spectrum assigned automatically in CYANA and the structure calculated. The NOE peaklists need to have either XEASY (sparky) or NMRView (.xpk) formats.
I would just make a couple of comments before ending:
- Pick your NOE peaks manually. It is best to do this to avoid noise and artifacts in the spectrum.
- Picking manually can also make use of the known chemical shifts to scan the spectrum up and down in rows/columns
- Pick all the peaks. We can take advantage of the symmetry of the spectrum to confirm NOEs
- Be sure to run "integrate" spectrum function perhaps before saving the peak list
We'll run the CYANA assignments of NOEs in a separate tutorial. It will be fairly easy to follow after having done this one first.
There a number of fantastic tutorials regarding AutoNOE assignments already available as well:
Appendix Files:
All of the files for the tutorial are available here:ORN_tut.zip